
VLANs An advanced Raspberry PI story
In the previous blog I talked about my need to be able to move an IoT device between a test environment and production services without needing to change the code. So it would find different servers depending on the environment it connects too. This relies on different DNS servers being on each VLAN. My intention is to use one RPI 4 (Raspberry PI) to run the DNS for both VLAN.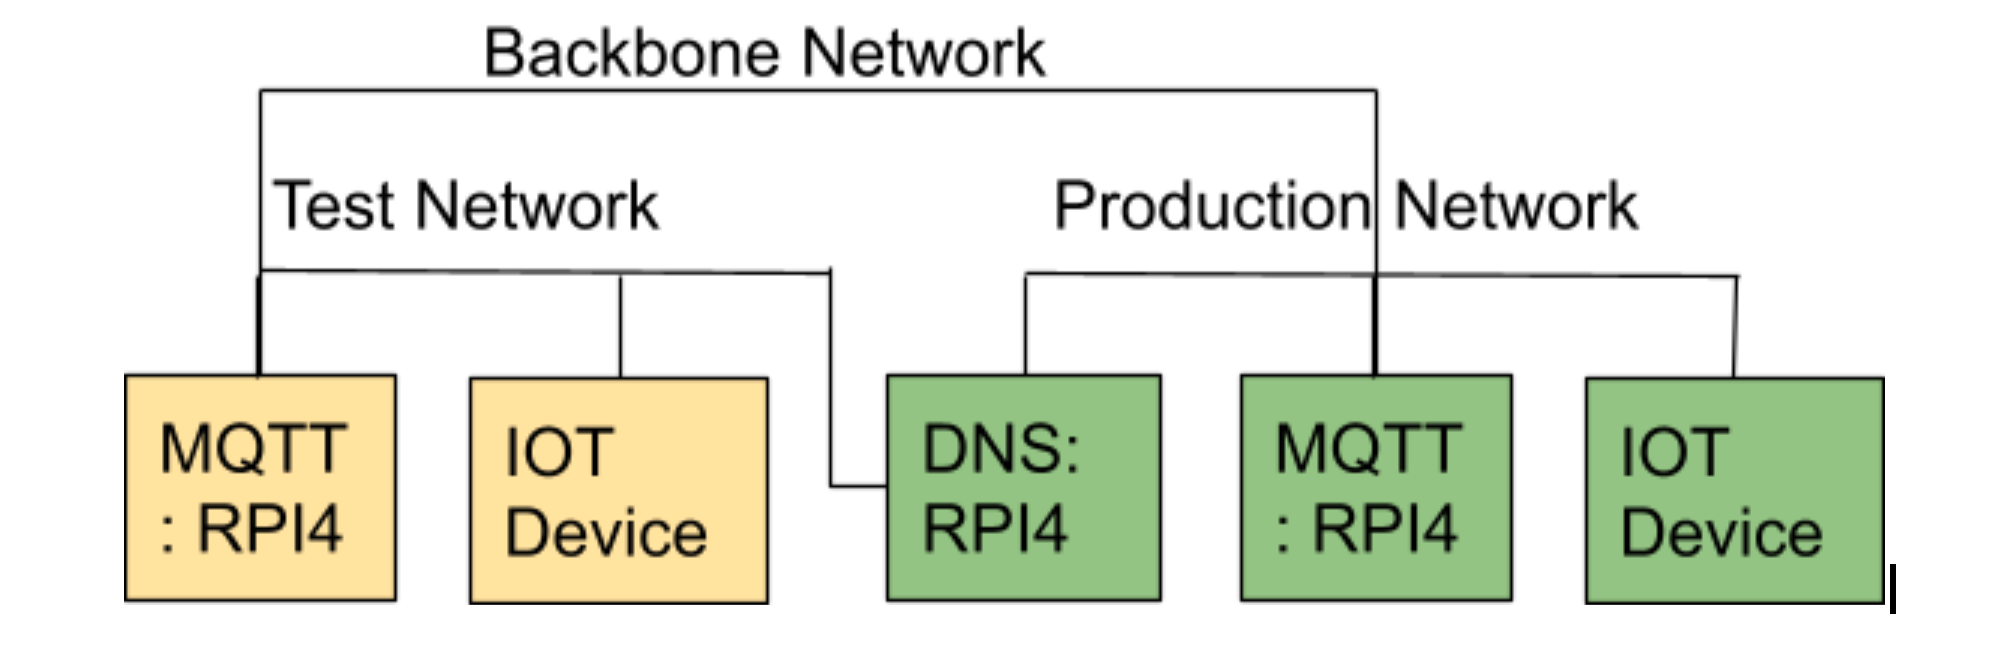
In this blog I will focus on how to connect the RPI to two VLANs and automate the configuration of this through an Ansible role.
What is a VLAN?
A VLAN is a virtual local area network. It is virtual in that it exists on the same switch ports and through the same network infrastructure as other VLANs. Basically each packet has a marker in the header to tell the switch which VLAN it belongs to, to allow separation to be managed.
A device can connect to multiple VLAN through the same physical RJ45 connection into the switch. Though physically it looks like one connection the operating system sees multiple network connections. It is this configuration that I am after for my RPI.
Your network switch infrastructure has to understand VLANs to work with this. I use the Unifi Switch and Network controller. So my first step into using VLAN is to configure them on the switch. A VLAN has a numeric identifier which represents the VLAN, and on unifi also a text name. So my TEST VLAN I will give an ID of 13. I will also need to setup other information for the VLAN:
- IP address range: 192.168.13/24 – Convention is to use the VLAN id in the IP range. Normally I use a class C or /24 address, giving me 255 possible ip address from 192.168.13.1 to 192.168.13.255
- Gateway address: 192.168.13.1 – My switch provides me a gateway off this network, that will route all my traffic to other VLANs or the internet
- DHCP host: 192.168.13.1 – This is what will dynamically allocation ip addresses to new hosts. Again provided by my network switch infrastructure
- DNS: 8.8.8.8 – This is an internet hosted DNS service which we will replace with our own in the next blog.
Command line management of VLANS
We will need to install VLAN capability on the RPI running Ubuntu 20.04 using the packages “vlan” and “net-tools” packages. VLAN are managed through the “ip” command. It is a simple three step process:
- Create a link: an ethernet interface for the RPI that is linked to the VLAN
- Add an IP address: my need is for a static ip address so I can run DNS services
- Enable the link: bring it into operational status
Create the link with the “ip link add” command. We need to tell it that the link is using our base ethernet interface (eth0), the VLAN we are using (13) and give it a logical name. By convention the name is the base ethernet interface name plus a dot and the VLAN number (eth0.13). The full command looks like:
# ip link add link eth0 name eth0.13 type vlan id 13
Now we need to give the link an IP address. I am going to use 192.168.13.8 in this example. We do this with the command “ip addr add”.
# ip addr add 192.168.13.8/24 dev eth0.13
Finally we bring the link online with the command “ip link set”, and we can test it by pinging the gateway.
# ip link set eth0.13 up
From another computer on the network ping the new ip address to see if it responds.
$ ping 192.168.13.8
Though this has connected our RPI to a VLAN this connection is transitory. If we reboot the RPI the network configuration will disappear and we will need to issue these commands again.
NetMap on Ubuntu
Ubuntu keeps the network configuration for the RPI in NetMap format in the files in /etc/netmap. On boot all yaml format files in this folder are processed to apply the network configuration. Some care is required as errors in these files can prevent the RPI from joining the network.
To achieve the configuration we have temporarily applied we need to create file /etc/netplan/eth0.13.yaml to look like:
network:
version: 2
vlans:
eth0.13:
addresses: [192.168.13.5/24]
id: 13
link: eth0
This lists out the new VLAN, assigns it’s IP address, vlan ID and the base link interface.
Automation with Ansible
I don’t set devices up every day as this is really a hobby, which means that I can get quite rusty on configurations. To help my memory I automate these configurations using Ansible. This way I can replay the configuration against any server in the future.
The ansible role I build to manage VLAN configuration on a Udemy RPI is available on github. You can reuse this or base your own roles on some of my ideas. Using the role I want to define a play to connect a host to VLAN 13 and give it a static ip address. This isn’t a very reusable play I agree, but you can pass the ip address in from the host file to make it more reusable.
– hosts: DNS
gather_facts: true
roles:
– {role: OracJoinVLAN, vlan: “13”, ip: “192.168.13.5” }
There are limitations on this role. It is only tested on Ubuntu, and would not work on Raspberry OS where netmap is not used. It also assumes the ethernet interface is eth0. That is fine for a RPI which only has one ethernet port.
The role first uses the “ip” command to provision the VLAN before setting up the netplan. This should give us early warning of issues with our configuration. The script also makes good checks to see if configuration is already in place, so that it only changes configurations if necessary.
Building the netplan configuration with ansible is a little tricky. I used the approach of defining the structure as a fact within ansible and then converting to yaml to write to the configuration file. There are a couple of problems with this approach. We need to define the new VLAN interface on line 4 as “eth0.13”, but in Ansible you cannot use a dynamic name for a key. Therefore I have temporary called it “VLANID” within the fact and renamed it using a config edit task once I have written the netplan to file.
The Ansible yaml conversion uses quoting that is not standard within a netmap file. I could not get to the bottom of why or how to avoid this. Therefore I took the workaround of a further config edit task to replace the quotes.
This approach means I can reliably write VLAN configurations in Ansible without having to remember “ip” commands and netplan configuration files formats.
In the next part of this blog series I will talk about configuration of DNSMasq to give us multiple DNS listening to different VLAN interfaces on a single RPI.
The roles discussed in this blog can be found on the github repo. A reminder that this configuration is to enable me to easily test and promote IOT devices built on the RP2040/Raspberry PI PICO to production without making code changes. You can find more about getting started on the Raspberry PI PICO in C on my Udemy course. If you are interested in IoT, Raspberry PI, IT Strategy and IT Architecture please do follow me on:

2 thoughts on “IOT promotion to Production without code changes – Part 2”