
An advance Raspberry PI Story
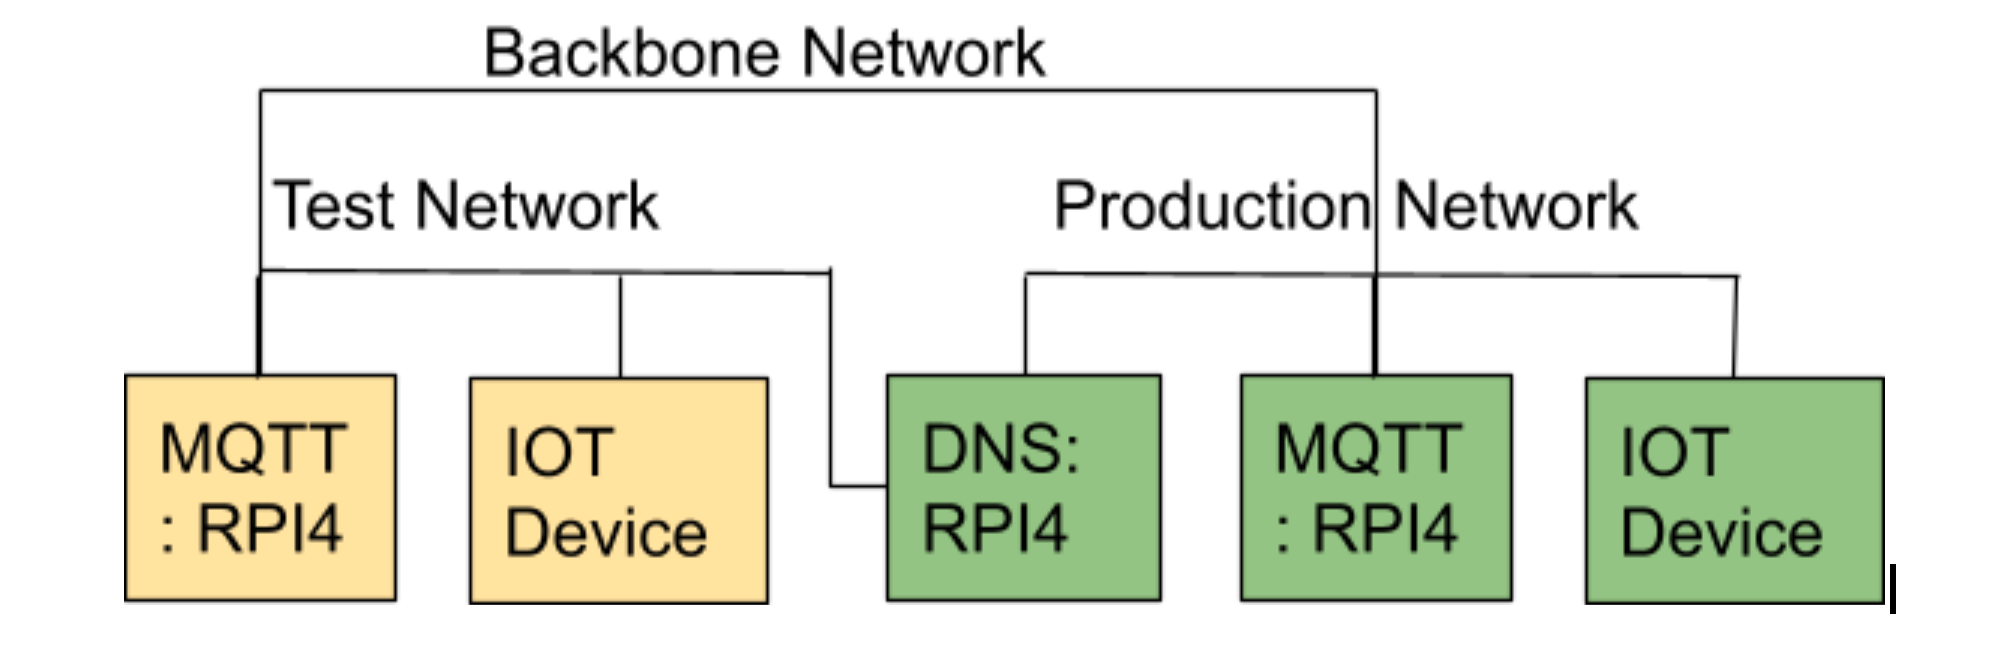
In part one of this blog I talked about my need to be able to move an IoT device between a test environment and production services without needing to change the code. So it would find different servers depending on the environment it connects too. This relies on different DNS servers being on each VLAN. My intention is to use one RPI 4 (Raspberry PI) to run the DNS for both VLAN.
In part two of the blog we talked through how VLAN are configured in Ubuntu and I presented an Ansible role to automate my provisioning.
In this blog I will focus on one approach to running multiple DNS services on a RPI, and have them answer requests from different network interfaces.
What is DNS
The DNS (Domain Name Service) is the directory of the internet. It is what maps between a human readable name, for example drjonea.wordpress.com, and the IP address of the server it maps to, for example 192.168.0.8 in IPv4. The DNS services within the internet form a distributed service where domain names to ip address mapping are published and cached, allowing for any dns to find an address. A DNS that publishes these mappings is known as authoritative.
In this blog I am going to talk about the setup of a Non Authoritative DNS, i.e. one that is not publishing the mapping to any wider DNS. The reason for this is that the addresses I am servicing are within the private IP address range (192.168.0.0/16) which is not internet routable. Private IP address ranges are what we have as local addresses in most home and corporate networks. For my use case two separate DNS servers publishing ownership of the same domain name but to different ip addresses would be a configuration issue.
If you have the simpler situation where you just need to resolve a domain name to a static ip address within the private ip address range then a DNS entry mapping to the private address can be placed in a public authoritative DNS. If you have bought a domain (e.g. jondurrant.com) then your provider will normally allow you to add domain names under that domain (e.g. elrond.mearth.jondurrant.com) and map to IP addresses. Publishing private IP addresses within the public DNS is not thought elegant as it exposes details about your internal network. Some would declare this is absolutely wrong but any digging into the public DNS space will find that this is quite common. It isn’t though what we are going to discuss here.
DNSMasq
The DNS service I will be deploying is called DNSMasq. Dnsmasq provides network infrastructure for small networks. It provides DNS, Dynamic DNS, and DHCP services. In this blog we are going to focus on DNS only.
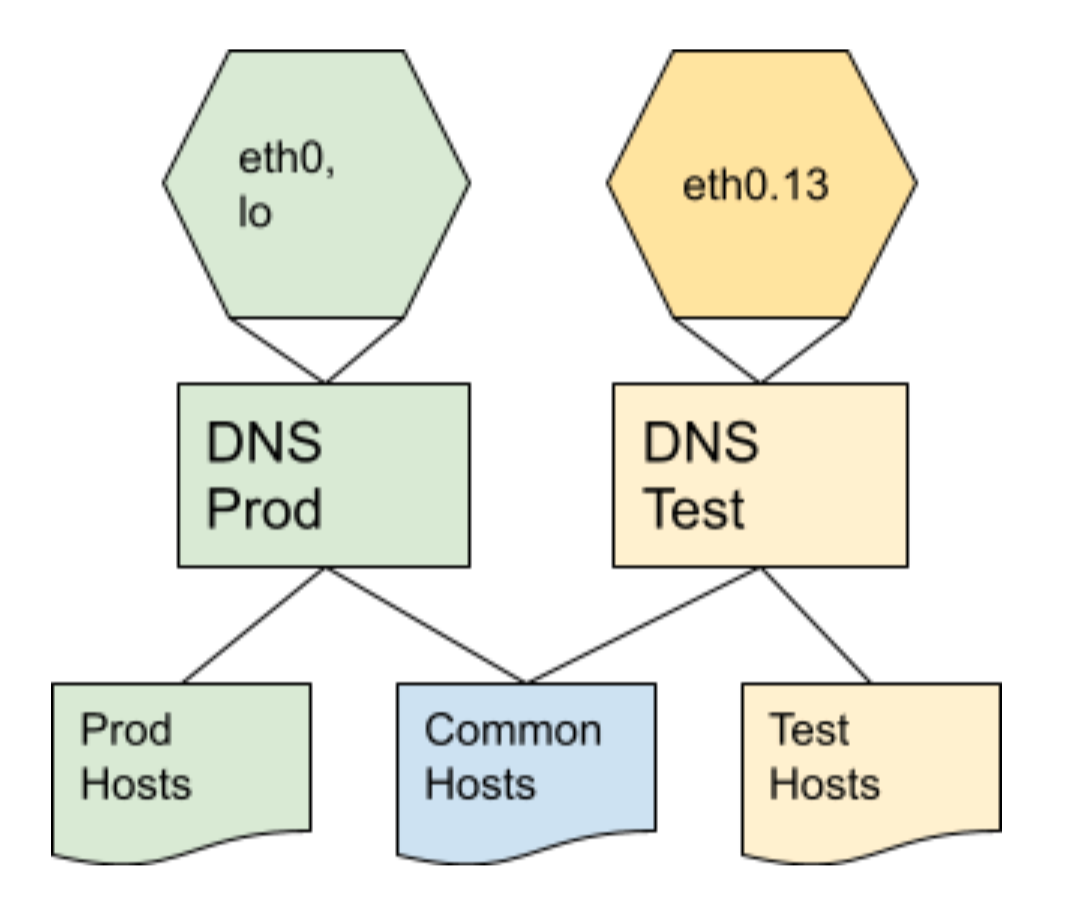
We will run two DNS on a RPI under Ubuntu. One will listen to our test VLAN (eth0.13), and the other listen to the main host network (eth0) and the localhost interface (lo). Each host will need a host file to pick up the domain to IP address mapping. We will set up a common host file to share across both DNS, and a specific one for each.
DNSMasq is a standard package within the Ubuntu distribution and can be easily installed with apt.
$ sudo apt install dnsmasq
Prerequisites to running multiple DNSMasq instances
DNSMasq on install creates a configuration file at /etc/dnsmasq.conf. This unusually overrides flags given directly to DNSMasq so for my installation I removed this configuration file.
A DNS listens to tcp port 53 to answer DNS requests. Every RPI will already have something listening on this port and connecting to the local DNS. Without such a service on the local host the RPI would be quite broken as unable to lookup any domain name. Out of the box Ubuntu will have configured named to provide DNS services. You can see this by issuing the command:
$ sudo netstat -ltnp
A few of the lines from my system:
Proto Recv-Q Send-Q Local Address           Foreign Address         State       PID/Program name
tcp        0      0 192.168.0.92:53         0.0.0.0:*               LISTEN      1754/named
tcp        0      0 127.0.0.1:53            0.0.0.0:*               LISTEN      1754/named
tcp        0      0 0.0.0.0:22              0.0.0.0:*               LISTEN      1809/sshd: /usr/sbi
Named will need to be disabled, at which point Resolver will run instead and connect to port 53. So Resolver will also need to be disabled. You can disable these services through the systemctr command:
$ sudo systemctl disable named
$ sudo systemctl disable systemd-resolved
This will make the RPI very unusable so I would suggest not doing this instruction at a time but using the Ansible role we will come on to talk about.
We will also need to setup the local host files. These are simple format of one line per entry of IP address, space, and domain name. For example file “/opt/oracMultiDNS/all/hosts”:
192.168.0.10 unifi.home
192.168.0.8 dns.home
192.168.0.1 gw.home
Running multiple DNSMasq instances
To run multiple instances of DNSMasq we must control what interface they bind to. The following command causes a DNS for our test service to start and only bind to eth0.13, example test VLAN. We tell it not to bind to the localhost address with the –except-interface=lo option. It will read our common DNS host file from any file in the folder /opt/oracMultiDNS/all/ and test specific ones from /opt/oracMultiDNS/test/. It is also necessary to tell it the domain to search for unqualified entries and the DNS server to send any queries it cannot answer itself to.
$ sudo dnsmasq  --interface=eth0.13 --except-interface=lo  \
--bind-interfaces --no-hosts \
--hostsdir=/opt/oracMultiDNS/all/  --hostsdir=/opt/oracMultiDNS/test/ \
--expand-hosts \
--domain=”mearth.jondurrant.com” --domain-needed --server=8.8.8.8 \
--no-resolv --user=dnsmasq --cache-size=2000
For the production service we run a similar command this time binding to eth0 interface and allowing binding to the localhost interface.
$ sudo dnsmasq  --interface=eth0  --bind-interfaces --no-hosts \
--hostsdir=/opt/oracMultiDNS/all/  --hostsdir=/opt/oracMultiDNS/prod/ \
--expand-hosts \
--domain=”mearth.jondurrant.com” --domain-needed --server=8.8.8.8 \
--no-resolv --user=dnsmasq --cache-size=2000
We will want these commands to run each time the RPI boots and therefore make them a service file in /etc/systemd/system/. To make it generic I will have a service file for each DNS instance that I run on the host.
We can test our work by using the “dig” command to query a DNS entry.
$ dig www.google.com 8.8.8.8
Will query an internet hosted DNS service for google’s ip address. If we have setup out new DNS at 192.168.0.8 for production and 192.168.13.8 for test then we can test with the commands:
$ dig dns.home @192.168.0.8
$ dig dns.home @192.168.13.8
Ansible Role
I have automated this configuration in the ansible role “OracMultiDNS” which is on Github at https://github.com/jondurrant/Ansible-DNSMarqVLAN-RPI-Ubuntu. A play to setup the DNS as we discussed would look like:
- hosts: DNS
  gather_facts: true
  roles:
    - {role: OracMultiDNS, interface: "eth0",    hostsdir: "/opt/oracMultiDNS/all",   domain: "home", server: "8.8.8.8", user: "dnsmasq"}
    - {role: OracMultiDNS, interface: "eth0.13", hostsdir: "/opt/oracMultiDNS/test",    domain: "home", server: "8.8.8.8", user: "dnsmasq"}
The role will assume that host files are available within the ansible path, normally I put this in the files folder alongside the playbook. It will expect a hosts.all file and a host.<interface> file (e.g. hosts.eth0, and hosts.eth0.13). These will then get copied over to the server on configuration.
The ansible role is fairly straightforward and runs through the steps we have discussed in this blog. There are no clever tricks or nortable workarounds needed to do this configuration. Just quite a long list of configurations, which is why automation is needed.
Summary
This approach means I can reliably configure multiple DNS servers on my two RPI DNS servers using Ansible. Take a look back at part one on the concept I am working towards here, and part two on VLAN configuration. In the final part of this blog series I will talk about allocating VLAN based on MAC address using the Unifi product set.
The roles discussed in this blog can be found on the github repo. A reminder that this configuration is to enable me to easily test and promote IOT devices built on the RP2040/Raspberry PI PICO to production without making code changes. You can find more about getting started on the Raspberry PI PICO in C on my Udemy course. If you are interested in IoT, Raspberry PI, IT Strategy and IT Architecture please do follow me on:

One thought on “IOT promotion to Production without code changes – Part 3 DNS”